
This project has been on my list of dream DIY’s for about a year, and after moving into the new house it became a feasible project to tackle! This DIY playhouse makeover was a lot of fun (mingled with lots of mistakes) and I am so happy to share the process and reveal with you guys today!

Finding the Right Playhouse
The first step to a playhouse makeover is finding a playhouse…obviously! I found this one on Facebook marketplace for $30, but after seeing the condition it was in I was able to talk her down a couple dollars and bought it for $25. It was NOT in good shape! There was about 200 stickers on it, dirt and grime from years of buildup, and probably a couple of spiders hanging out in the corners.
My dad actually helped me pick it up and take it apart when we got home. My mom and I spent an hour power washing and scrubbing it to get all the stickers and dirt washed away. After leaving it to dry overnight, I could really see the sun damage and sadness of the little house in the morning light, so off to Home Depot we went!


The Design
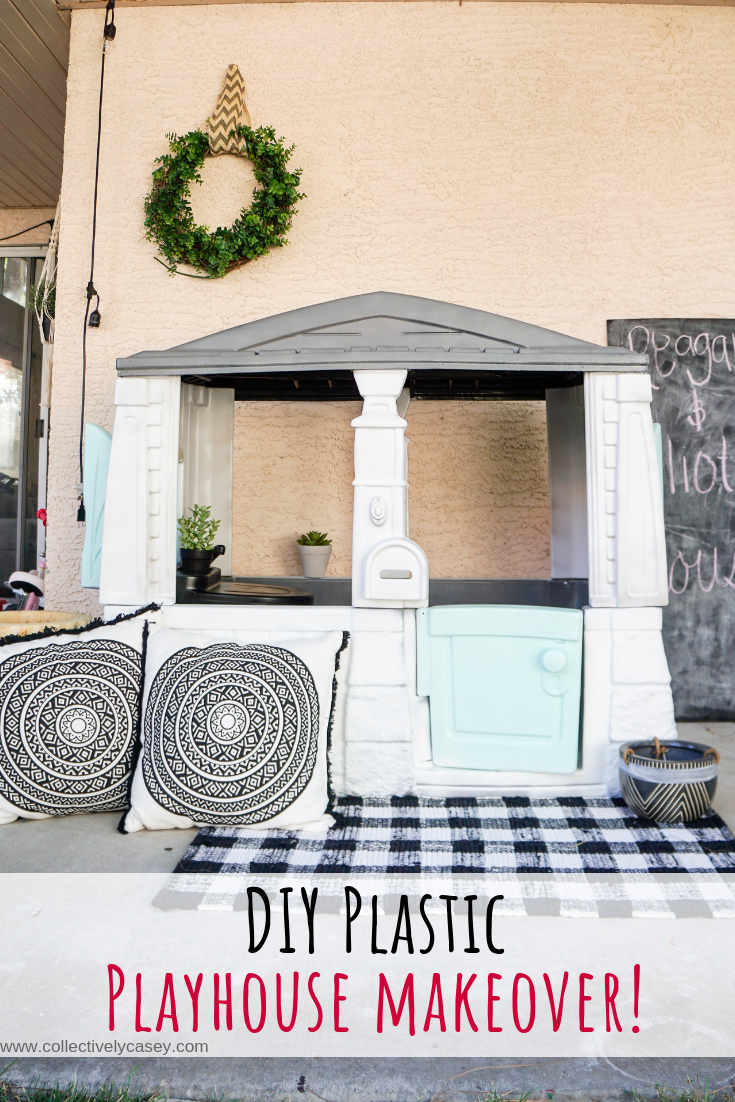
The design for this playhouse is not original, in fact I’m sure you’ve seen similar colors on playhouses all over Pinterest before! But after showing my girls different pictures they kept saying this was the one they wanted, so it’s what we went with!
For paint, I used all Rustoleum products! This particular line works well on plastic which is the key when spray painting a plastic playhouse. I made sure to do a light coat of primer on everything, and discovered the hard way that I definitely needed a few coats of sealant afterwards! Here’s the exact paint colors I used:
Paint List
–2 cans of Flat White Primer General Purpose Spray Paint
-Rust-Oleum Painter’s Touch 2X
-Roof & Interior: 3 cans of Granite in Satin finish
-Body: 3 cans of White in Semi Gloss finish
-Door & Shutters: 1 can of Ocean Mist in Semi Gloss finish
–2 cans of Protective Enamel Flat White Spray Paint
Tips
-Take as much of the playhouse apart as possible! The parts you can’t take apart can be taped using painters tape.
-Follow the directions for drying time. This will ensure the strongest bond and highest durability for the paint to last a long time.
-Seal with protective enamel before putting the house back together! When you put everything back together you are bound to bump pieces together and scrape some paint off.

My Mistakes to Avoid
-Decide on a for sure color scheme before you start painting. And avoid doing black paint in anything but a matte finish! It will look like a trash can! I spent way too much money on this project because I didn’t like the original colors I picked and ended up repainting the whole thing.
on that note…
-Buy MORE spray paint than you think you’ll need! There is nothing more irritating to me than having to run back to Home Depot in the middle of a project because I ran out of supplies. Buy more than you think you’ll need, and if you have extras you can use it on future projects!
-Again, USE A SEALANT! You definitely need one haha. And put 3+ coats on high use areas, like the doors and windows that will scrape on other parts frequently.


Accessories
I shopped our home for some fun little things to add to the house to make it homey, and I’m still looking for a cute flower box and door mat! But here are links to the things I was able to decorate for now:
Buffalo Plaid Rug – Under $20 and free Prime shipping!
Faux Potted Succulents – These are under $20 for a 6-pack!
Similar Pillow Covers – So many colors and patterns! I sprayed with Scotch Guard so they’re okay to stay outside.
Cost
Even with the added cost of buying more paint to repaint the house twice, this still cost me less than buying the house brand new! All in all, this cost me $85 with this particular playhouse selling for $115 brand new in stores.
Doing your own DIY playhouse makeover is a simple project that even beginners can accomplish. It took me a couple of days to paint everything and put it together, so this makes a quick weekend project that your kids will love and thank you for! I’m looking forward to lots of time spent out here as the weather starts to cool down in Las Vegas and we start enjoying our awesome back patio! If you have done your own DIY playhouse makeover, drop a picture in the comments or share it with me on Instagram and I will share it with my followers!
For the other DIY and Home Projects I am completing, check out the Home Decor tab on my blog HERE.
Hi! Found your blog recently through Pinterest! Wondering how well this paint has held up for you using the process you explained? Thanks! 🙂
Author
Hey! The paint chipped in high traffic areas or where the plastic rubbed together (windows, front door step) but I just touched it up every now and then to keep it looking nice!